Posts

Showing posts from September, 2017

Unique 'Custom Depth Stencil Value'

Image
Step 0. In special cases, you need to set a unique value for all 'Custom Depth Stencil Value'. Step 1. It is hard to update it with blueprint. We have to change Unreal Engine 4 source code. Please see the image below. Result. Check 'Render CustomDepth Pass'. Move camera. You can see that each value is different. More. - Do not forget. The stencil value size is limited to 255. - You can also assign a new value by considering the original value(e.g. Assign automatically if >99). If so, you can use other stencil features.
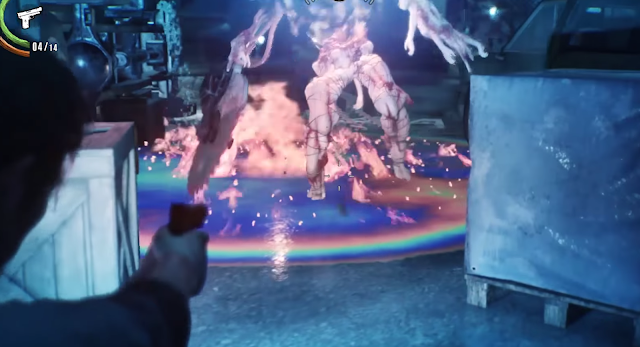
Oil puddle that can be burned.

Image
Step 0. Let's make an oil puddle that can be burned with fire.  If you want simple one(single actor with static mesh, limited shape), don't need to use physics material or multiple fire actors.  In this time, we will make more flexible system. Unlimited shape, and perhaps it will work with dynamic decal if you change a bit more. Related post :  Surface reaction character Step 1. These are final assets. The fire particle is from Unreal Engine 4 sample. Open 'Project settings'. Add Physical surface properties. Step 2. Create new PhysicalMaterial and select surface type. Step 3. Create a oil material and change Phys Material. Make planes with the material. Step 4.  This is the oil fire actor blueprint. If you look at the function name, you'll see what it does. Use overlapping actors array and avoid line-trace function calls. Step 5.  Fire with LMB. More...  Do not

Full screen afterimage material(Drunken effect).

Image
Step 0. Let's make a full screen afterimage material and character. It is usually used to show a drunken effect. Step 1. We need to capture current scene. It's very easy to do that with unreal engine 4. Add new render target texture. Increase size if you want better result. Step 2. Create new character class and add a sceneCaptureComponet2D to the character. Change properties(red boxes). Step 3. Create new post process material. Screen UV and rendered-texture UV do not match. So, we need to fix it. Step 4.  This is the character blueprint. Update the rendered texture with delay. It's done. These are final assets.

Surface reaction character with physical material

Image
Step 0. Let's make a surface reaction character on Unreal engine 4. We can make it with trigger box(volume). But character with physical material is more accurate and easier to setup. Step 1. These are final assets. Maybe you don't need 'mud' things. Open 'Project settings'. Add Physical surface properties. Step 2. Create new PhysicalMaterial and select surface type. Step 3. Create a material and change Phys Material. Step 4.  This is the character blueprint.  How to find a slope vector from normal : https://stackoverflow.com/questions/4372120/how-do-i-calculate-the-downward-slope-vector-of-a-3d-polygon More...  In most cases, we do not need to do check surface on every tick.

Rendering into the wall(2d and 3d freely changeable material) tutorial.

Image
Step 0. A lot of people were impressed with 'Super mario odyssey' wall play. Of course I am. So I tried to make a 2d and 3d freely changeable material. In this tutorial, only the x-axis value works but I hope you know how it fully works. Step 1. These are final assets. 'NoRanderingMaterial' removes the chest symbol of default character. Duplicate default character material and insert new nodes just like image below. This is larger screenshot. In this tutorial, only the x-axis value works. Step 2.  Add new 'trigger box'. It toggles material parameter value. Step 3. Setup wall trigger box into the level and change 'Wall Direction' value. Step 4.  It's done.  Type Console command 'Show Collision'. Real character actors are still stand in same location. More...  There are so may issues to make it complete. Curved surface, actor collision, custom rendering in wall space...  It is out of this e

How to draw outline without stencil buffer

Image
Step 0. Let's make an outline material. In this time, not based on stencil buffer. Step 1. Setup a additional skeletal mesh. How to setup(previous post) : https://gameenginebread.blogspot.com/2017/09/render-skeletal-mesh-with-different.html Step 2.  This is the plan.  - Draw the outlined mesh slightly curved(larger).  - Useless pixels are removed with depth test. Step 3.  This is the material blueprint. Step 4.  Adjust the thickness as desired. More...  Related post : https://gameenginebread.blogspot.com/2017/11/screen-space-outlinepost-process.html

Render skeletal mesh with different materials.

Image
Step 0.  If you can render a skeletal mesh multiple times, there are a lot of things you can do.  It's very easy on Unreal Engine 4, but there is not enough documentation I think. So I tried to summarize it simply. Step 1. Setup additional skeletal mesh.  - Set some things the same, such as position and rotation.  - Normally turn off lighting and collision. You may tried this time, It does not work as you want. Step 2. Use 'Set Master Pose component' blueprint. That's all.  We can't sure rending order. Consider pixel depth value instead. Then it will work even if it works on another OS.

Afterimage character

Image
Step 0. Let's make a character afterimage. In this time, we will use a single character with additional skeletal mesh component(Not a additional pawn). Step 1.  We need a animation blue print and character class. The whole structure is like this.  a. Add new 'SkeletalMesh Component' to AfterimageCharacter.  b. Store all data for afterimage.  c. Set old data for afterimage SkeletalMesh.  This is the character class setup. See red boxes.  AfterimageSkeletalMesh's AnimClass is changed. Original skeletal mesh's AnimClass is still 'ThirdPerson_AnimBP'.  Ignore component rotation. It will be changed in game. Step 2.  This is the animation blueprint.  In this case, very simple. Compared to 'ThirdPerson_AnimBP', you will know the purpose immediately. Step 3.  These are save and load functions. Step 4.  Tick event.  If the speed is sufficient, store the data.  If the stored data is sufficient,