Posts

Showing posts from December, 2017

Changing the alpha of a blueprint connection line

Image
Blueprint UI is already great but you may want to change it a little bit. In this posting, we will change the alpha of link line. The example is simple, but you'll get an idea of where to fix it. Step 1. \Engine\Source\Runtime\SlateCore\Private\Rendering\ElementBatcher.cpp Locate the above file and modify it as shown below. Honestly, it is not as readable as the original code. Let's improve a little more. Step 2. Let's change it to only apply when the line length is greater than 700. Here is the result screen. I picked a blueprint that included longer lines. The mid blue line is much more readable. It would be nice to add more exception conditions. I will finish the example here. More. Consider the following: Applies only when the length is very long(>=1000). Applies only when the curve has a large S shape. You can also change 'Thickness' instead of 'Alpha'. It should be able to turn on/off on the setting scre...
Visualize game stat in the editor's viewport

Image
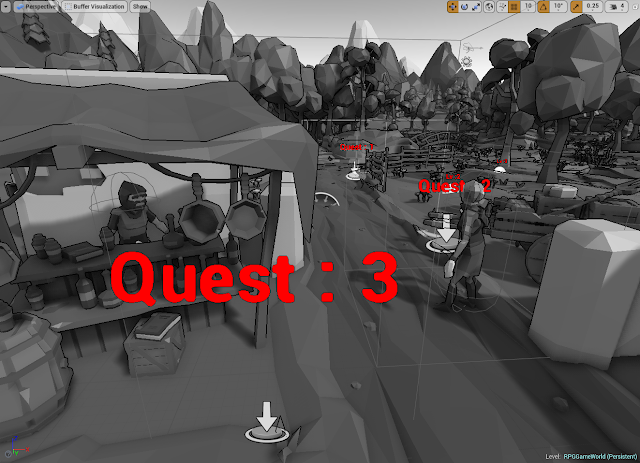
In previous postings we implemented the ability to manage game content using 'Customize Buffer Visualization' and 'TextRenderComponent'. https://gameenginebread.blogspot.com/2017/12/customize-buffer-visualization-for-rpg.html However, depending on the situation, it can be more convenient if the changed value is automatically applied to the 'TextRenderComponent'. So in this post, let's create a class with 'TextRenderComponent' to use this feature. Step 1. We will implement a class to find the variable of the specified 'Parent(Owner) Actor' and output the value as text. Create a 'VariableWatcherComponent' class that inherits from 'TextRenderComponent'. Step 2. Let's skip the long explanation and see the results. This is the final code. This code only supports numeric variables. VariableWatcherComponent.h 1 2 3 4 5 6 7 8 9 10 11 12 13 14 15 16 17 18 19 20 21 22 23 24 25 26 27 28 29 30 3...

Mini map : Match 2D images to the 3D world

Image
In this post, Lets's talk about how to match 2D images to the 3D world with Unreal Engine 4. A lot of things are needed to create a AAA game style mini-map. Here are a few typical requirements:  - Priority for indoor and outdoor support.   - Indoor mini map should working with various house shape.  - The top direction of the 2D image may not be the north direction.  - Easy to setup. If you have a wide world and a lot of mini-maps, the easiness of installation is most important.In such cases, you should be able to install and verify immediately in the UE4 editor. You must use C++ class this time to make it working in the editor. This is because the 'PostEditChangeProperty' function is required and editor's viewport action does not run 'Blueprint' at all. Step 1. It takes a long time to describe each item, so I'll show you the final result immediately. This is the result video. Step 2. This is the code of MiniMapActor. ...

'Behavior Tree' basic tutorial for RPG citizen

Image
This is very basic tutorial but the contents of the official document are omitted. Official document : https://docs.unrealengine.com/latest/INT/Engine/AI/BehaviorTrees/QuickStart/ Behavior Tree is a concept unfamiliar to many people. The links below have been very helpful in understanding a behavior tree : https://en.wikipedia.org/wiki/Behavior_tree_(artificial_intelligence,_robotics_and_control) Official Unreal tutorial is great but in this time, we will make more simpler one. So, let's implement a general RPG game NPC AI. Step 1. Plan NPC have 3 tasks.  Wandering : Go here and there(where 'note' actor placed).  Look around : Do rotate for a while.  Angry to player : Keep watching player till go out of sight. Step 2. Behavior tree This is the final behavior tree result. We will make 3 custom tasks and 1 custom decorator. (If we have the opportunity, I will cover more in other articles) Make new 'Task' blueprints. Step 3....

Look at the object by rotating head

Image
Step 0. If you move the character's head according to the environment change, the game quality will increase. It feels like there is a better AI and more animations. So we try bone rotation to see world actors. Step 1. Place NPC characters. You can substitute another class for testing. Step 2. Edit character blueprint. Add a vector that named 'InterestingLocation'. Add a function to find the nearest interesting location in the world space. Step 3. Find proper bone to use. We will use 'neck_01' here. Step 4. Edit AnimGraph. Add a 'Transform bone' node. Set the value as shown in the screenshot below. Step 5. This is animation event graph. Depending on character blueprint and bone rotation, 'Make Rot from Y' should be replaced with 'Make Rot from X' or something else. The remaining issue... - If you want smooth transition, you need to make more changes. - It shou...

Customize 'Buffer Visualization' for RPG game field

Image
Related post : https://gameenginebread.blogspot.com/2017/12/visualize-game-stat-in-editors-viewport.html Buffer visualization is very useful for rendering issues. But you can use it for your own game content development too. Especially your game has large field and many monster spawn locations, you may need this. Step 1. Adding Buffer-Visualization is very easy. Open 'BaseEngine.ini' and set a post-process material. Step 2. Now, let's make materials for buffer visualization. We assume that 'custom depth buffer' is not available. And don't bother other systems. So, we need a trick. Use 'Metallic' and 'Roughness' for notification object pixel. Materials are very simple. You can understand without more description. Step 3. This is a Monster-spawn-location Blueprint actor. A very simple sample... Set the material and check 'Hidden in game' and 'Editor only' of that component. More. ...

Texture generator, Python Per Pixel (C#, IronPython, Python)

Image
Step 0. You can see previous C# texture generator code : https://gameenginebread.blogspot.com/2017/02/this-is-c-code-to-generate-custom.html It was a code-based tools and only available to programmers. Python is one of the best script for everyone. So let's create the tool again simply with Python. Step 1. Create a new C# project. Download 'iron python' and add DLLs to references. IronPython : http://ironpython.net How to setup : MSDN : Running IronPython scripts from a c# Step 2. Add controls. I have not changed the button name, but it will be understood. Step 3. This is the code. 1 2 3 4 5 6 7 8 9 10 11 12 13 14 15 16 17 18 19 20 21 22 23 24 25 26 27 28 29 30 31 32 33 34 35 36 37 38 39 40 41 42 43 44 45 46 47 48 49 50 51 52 53 54 55 56 57 58 59 60 61 62 63 64 65 66 67 68 using System; using System.Drawing; using System.Windows.Forms; using IronPython.Hosting; namespace PythonPerPixel { public partial...