Posts

Material Parameter Test Helper(C++)

Image
In general, there are too many combinations of material parameter values. So, in this article, let's create a actor that help us. Step 1. New actor with C++ The c ++ fix is required to see it in the Editor Viewport. UpdateMaterial () content is a core feature of this actor. Step 2. Blueprint Decorate the Actor a little. Step 3. Material Create a test material. Step 4. Level Place multiple StaticMeshActors and apply test material. Set Actor and value as shown on the right side of the screenshot. Step 5. If you want to check the values in detail, double-click the material. The remaining issues - Sometimes material values may not be applied properly. If so, restart the editor or level. - Vector parameters must be supported.
Material Function for Diffuse control curve

Image
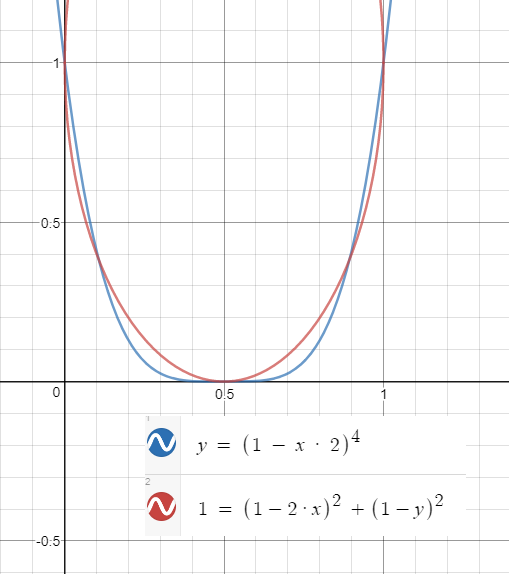
For a while I have tested some ideas for adjusting the Diffuse color curve in the material. I have found the results I want, and I will give you an overview of the process and the results. It was designed so that the following conditions were always satisfied. - Do not use sqrt, if, or trigonometric functions. - Pure Black should be kept at 0,0,0. - Linear from black to white. - It should be possible to control with only one parameter in Material Instance. - Must be adjustable to a normalized (-1 to 1) value. Step 1. Find Equation There are websites that draw graphs of equations. Using them will be very helpful for development. We will get the value (y-axis) to multiply according to the brightness (x-axis) of the color. The red line is the ideal circular curve. The blue line is a simplified version of the red line without Sqrt().  We choose this. Step 2. Material Function Create a new material Function.  The final content is simple. Step 3. Validat

Liquid material in a bottle

Image
This time we will create a liquid material in a bottle. You can think of it divided into liquid surface and inside. Let's implement surface changes. Step 1. Material This is the material. Use the dot to judge the side face to maintain the normal of the side face. Add the Wave Height one more time so that the World Position Offset does not become smaller than 0. Step 2. Bottle Actor The bottle consists of two Skeletal Mesh Components. The internal Skeletal Mesh Component has a Scale less than 1. Glass material for BottleMesh : https://docs.unrealengine.com/en-us/Engine/Rendering/Materials/HowTo/Refraction Step 3. Parameter We have to set 'Actor Up' vector parameter. Result These are the last implemented resources.

UI In and Out material

Image
This time, we will create a material that can be used for a UI object to appear or disappear. Step 1. Material This is the material. Do not use 'if' nodes as much as possible. Step 2. Parameters Weight : You need to change it when the UI comes or goes out. Noise texture : This determines the appearance of the animation. Pick color texture : 1D texture just like this. Result With more modifications, you can easily implement various animation effects.

MatCap material

Image
In this post, let's create a MatCap material. Please refer to the link below for a description of the MatCap material. https://www.youtube.com/watch?v=Yg5ULaS2jMk or http://wiki.unity3d.com/index.php/MatCap Step 1. Material This is the material. Step 2. Texture You should have textures similar to the following: Step 3. Result

Simple morphing with material

Image
Morphing with material can reduce animation production costs. You can also take advantage of the unique feel. Let's make a simple example. Step 1. Material This is the material. The most important thing is how to construct 'the final shape'.  There are so many possibilities.  In other situations, you can replace it with 'local position' instead of 'world position'. At the middle step, add some noise to make it look magical. Step 2. Update Parameters This is the Blueprint of the Morphing Character. More... Consider these. You can not control details. So, this method may not be effective if it is slowly deformed. You must have the appropriate animation. It is better if the appropriate particle effect is used at the same time. Perhaps the material node graph will become very complex. Optimization is required. It may be better for a projectile than a character. (e.g. Ghost shape arrow)

Maintaining a Line of Unexecuted Nodes

Image
Sometimes you do not want to run some blueprint nodes, but you may want to keep them connected. You can do that with 'Blueprint macros'. Step 1. Create new 'Blueprint Macro Library'. Step 2. // This is the result. Step 3. /* , */ This is the result of each. In this case, you need to create a '*/' node that very useless and not clear. Step 4. /// This is more effective than previous implementations.